Sunday, October 27, 2013

The Engine Bay (Part 1) - Ford FE 352 Valve Covers

I begin to clean up the engine bay as I can see by peering under the hood that many wires are going nowhere, fragments of upgrades past that have been removed for one reason or another (Uncle Ken once had cruise control on Old Blue!), Oil and other fluids have splashed on the various components and a fine rust permeates across the Fender wells, firewall, radiator and most of the electrical component boxes.

I will NOT do a restoration but I would like to get an idea of what wires are being used, what is causing the various leaks and see what I can do to eliminate fluid loss and rusting of the engine bay.

It does not take long to see the valve covers are oozing oil ... Reading up on the FE Forum first step is to check valve covers and gaskets. This seems to be a common problem with these old trucks but I will need to get a Torque wrench to perform the maintenance.

After cleaning the oil off all the parts I can reach, I ran the truck for a few days and took another look under the hood. I notice there is also just a little oil now on the front of the oil filter .. touching around the various pieces I think I feel dampness on the bottom of the oil pressure sending unit. hmmm ... maybe it needs tightening or something I will also read up on this little piece of mechanical mastery....

Next Steps:
1. Buy Torque wrench - I checked out what Sears, Napa and the usual suspects had in stock and chose one of the Napa offerings. I got the analog version as I did not read anything that said the digital was any better. It cost about $50

2. Find out what Torque to apply to bolts - I posted this question on the Ford Enthusiasts forum and was told to get a copy of the old 1966 Ford Truck shop manuals off of EBAY. When I looked around, I found they were being offered as digital copies on DVD (around $25) or the old printed versions for between $60 - $150 for the set of four books. I found one offering for Vols 1,  3, 4 for $11 and Uncle Ken sent me Volume 2 and the Preliminary so I got the complete set for $11.

I spent all my spare time for the next week reading through the manuals and found on page 8-248 of Vol 2 a table showing the Ft-Lbs for the Valve Rocker Arm Cover for the 352 to be 10-12. OK!

3. Find replacement valve cover bolts (one is broke).  I notice that on the passenger side nearest the carburetor one of the bolt heads has snapped off and the bolt will need to be replaced. I asked at Napa if they had anything and they did not. The man at the counter said that the bolts need to come with the lock washer already on it and to get a size 5/16"-18 x 5/8"  hex-head bolts with the split washers. He said from the factory the correct markings on the bolt head would be AMK428. I found some New Old Stock (NOS) on EBAY for $8 for a set of 10 and bought them. I also picked up a stud puller since I will have to remove the bit of bolt now stuck in the engine block.

4. Find replacement gaskets. Easy as a trip to Napa. I decided on the rubber cork type since many people said they seat the often misaligned cylinder head covers well. Minimizing the potential for vacuum leaks. 

5. Repaint Covers? -- YES! I will try to find someplace in town to bead blast the covers and then paint them OLD FORD BLUE (Duplicolor). I read a ton of forum threads on the appropriate color of the 1966 352 valve covers and after all kinds of analysis by many people much smarter than me about such things they determine that in 1966 Ford sold the F-250's with BLUE engine blocks and BLUE Valve covers. Either the Ditzler paint code 22362 or the Duplicolor 'Old Ford Blue' will work. I found the Duplicolor at the local Napa store for $5 and picked up some VHT high build primer at the same time.

6. Removing Valve Covers - pulling broken stud.
7. Stripping
8. Painting
9. Replacing Gaskets
10. Mounting Valve Covers with new bolts

Should be a fun little project!

Monday, October 21, 2013

License Plate Options for 1966 Ford Truck

So I will have to replace the current IOWA license plates on Old Blue. Looking through the DMV website I have a few options when it comes to a 47 year old vehicle in this state. A couple of gotcha's here that need to be considered. In California, all pickup trucks are licensed as commercial vehicles so I will need to get the truck weighed and then be sure I get commercial plates. Commercial plates for a 1966 Truck can be:

1. Current Commercial
commercial motor vehicle license plate

2. Personalized 

Blue on white with any text up to 7 letters - OLD BLUE or OL BLU 66.
Environmental Plate Image

Many types available. See https://www.dmv.ca.gov/online/elp/elp.htm


3. Legacy License Plate Program 
California Legacy License Plate program offers the opportunity to purchase replicas of California license plates similar to those issued in the 1950's, 1960's, and 1970's. The program requires a minimum of 7,500 pre-paid applications prior to January 1, 2015 to be implemented.

Legacy License plates can be ordered for any year model automobile, commercial vehicle, motorcycle, or trailer. The Legacy License Plate Program will not replace the current Year of Manufacture (YOM) license plate program.

row of legacy plates with total applications approved

From the CA DMV website:

Q1: What is the fee to order Legacy License Plates?
A: $50.

Q2: Does the application fee of $50 apply to either a sequential or a personalized license plate?
A: Yes. The fee is the same for either choice of plate configuration.

Q3: If the Legacy License Plate Program is implemented, what other fees will be due?
A:$40 for renewal
   $15 to transfer the plates to another vehicle
   $35 for substitute plates
So, it looks like Legacy plates (IF implemented) would cost $50 to order and $40 per year for renewal. 


4. Year of Manufacture (YOM) 
YOM plates are any officially manufactured California license plates issued prior to 1969 for auto, motorcycle, or trailers and extends to 1972 or prior for commercial vehicles that the department determines are legible and serviceable.

From the CA DMV website: 
  • Year of Manufacture (YOM) license plates are any officially manufactured California license plates issued in:
    • 1969 or prior, for autos, trailers, and motorcycles, and
    • 1972 or prior, for commercial vehicles.
  • In lieu of the license plates otherwise required for the vehicle, YOM plates may be assigned to any currently registered:
    • 1969 or older year model auto, motorcycle, or trailer of a corresponding model year, or
    • 1972 or older commercial vehicle of a corresponding model year.
  • The department must determine that the YOM plates are legible and serviceable prior to assignment to a vehicle.
  • Vehicles with YOM plates:
    • have full operating privileges, and
    • are not restricted to participation in historical vehicle activities.
  • Kit cars (SPCNS) of vintage automobiles (for example, a replica of a 1928 vehicle) do not qualify for YOM plates.
  • YOM plates must be supplied by the vehicle owner and authenticated by DMV personnel.
    • Base year license plates must have the appropriate year validation sticker attached to the plate to be authenticated as other than the base year.
      Examples:
      • A 1956 license plate with a 1958 sticker equals a 1958 plate and must be placed on a 1958 year model vehicle.
      • A 1963 license plate with a 1968 sticker equals a 1968 plate and must be placed on a 1968 year model vehicle).
  • Blue and yellow plates:
    • do not have a specific year model designation, but were not introduced until 1970, and
    • therefore are only valid for 1970-1972 year model commercial vehicles.
  • Unique plate series, such as exempts, dealers, etc., will be authorized for currently qualified applicants only.
    Example: California dealer #103 (if currently licensed) would be allowed to use an authenticated 1956 dealer plate #103 on a 1956 vehicle registered to the dealership. The plates must be:
    • original (legible and unaltered characters), and
    • a configuration authorized for the year of the vehicle entered on the application.
  • Legitimate YOM plate configurations may be determined by verifying the plate(s) against the plate information contained in Appendix 1E.
  • The YOM plates must be acceptable by the department and may be rejected by the department if the configuration carries any connotations offensive to good taste or have been restricted or removed from regular series license plates.
    • Two license plates are required for every qualifying vehicle, except trailers or motorcycles require a single plate, and
    • The vehicle and the license plate must be compatible (for example; a motorcycle plate to a motorcycle).
    • Weight fees must be collected on all commercial vehicles.
  • Because the department does not have year model information for all historical vehicles, the YOM applicant may have to prove that the year model of the vehicle described in the application is correct.

For Old Blue we would need:
a. The yellow on black 1963 issue commercial California plates - two matching plates.
b. A yellow 1966 sticker
c. A lot of interactions with DMV about verification that no computer records exist for plates selected and that the plates meet subjective usability criteria.

commercial motor vehicle license plate

FEES FOR Year of Manufacture Plates: 
Year of Manufacture (YOM) Plates (CVC §5004.5)     Fee   
Original  $45
Renewal  $10
Reassignment $12
Retention $20

So, it looks like YOM plates would cost $45 to originate and $10 per year for renewal. However, I will need to buy the plates and get a 1966 sticker so add another $120 to total costs. Searches at google yield websites selling match pairs of 1963 issue commercial plates for $250 - $500 a set. Ebay searches show pairs of the same plates for around $100. Be sure to verify with DMV via the 800 number that no computer records exist for a set of plates you want to purchase (regardless of source) before you put the money down!

SUMMARY OF COSTS
Cost of License Plates for 6 years 
Type           Plates   Origination  Annual     Total 
Current 0 0 0 0
Vanity* 0 49 38 277
Legacy 0 50 40 290
YOM 90 45 10 195

I WANT YOM Plates, total cost over first 6 years is less then other options and I get what I want as far as original color plates.


More Information at: 


Thursday, October 17, 2013

CHP VIN review - Where is the VIN on a 1966 Ford F250 Truck?

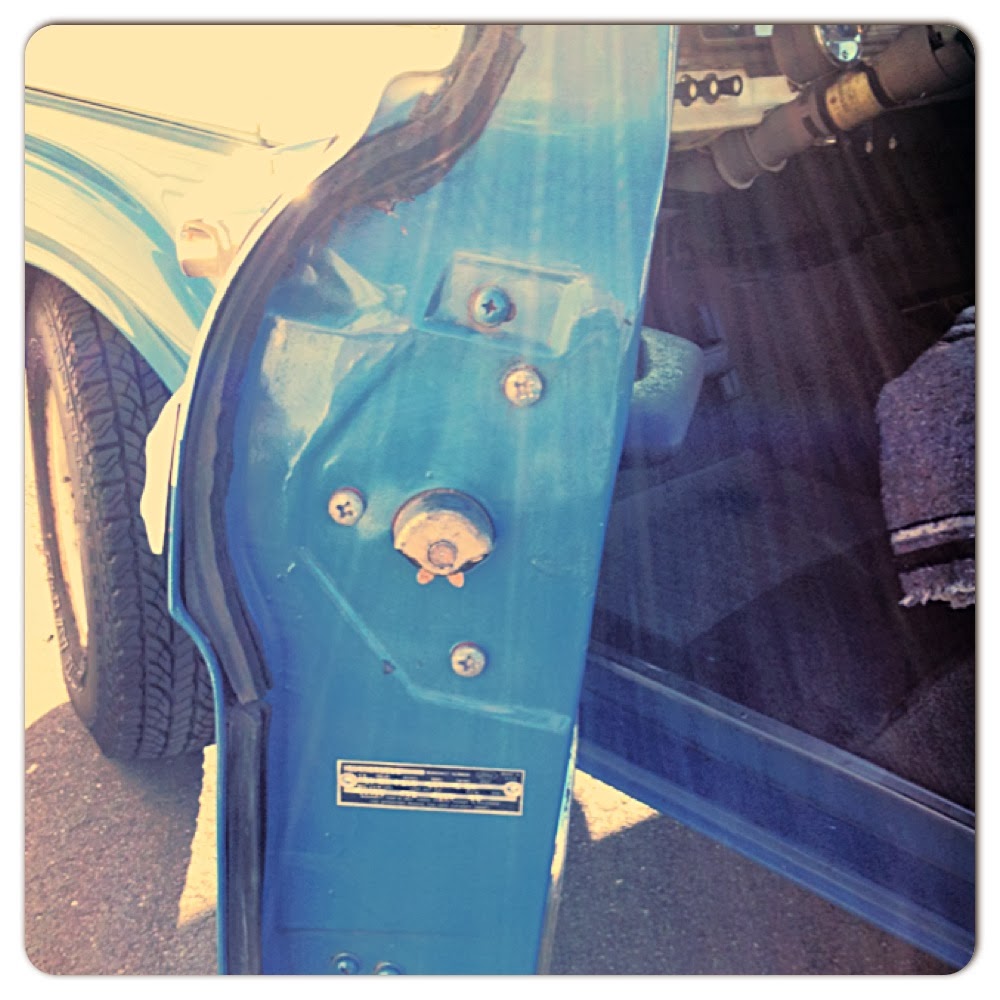
I was feeling well prepared and ready to talk to the CHP officer assigned to verify the VIN number on Old Blue. In the weeks since scheduling this review, I had remounted the VIN plate on the drivers door and had found and prepared for easy viewing the VIN number stamped onto the top rail of the iron frame.

On the front right (passenger) side down under the alternator on the top of the frame rail - I found the VIN


I had to sand, and scrape and I was not sure what i was looking for, but then I saw the letter F and with some additional elbow grease uncovered the stamped code. The code had stars before and after the VIN code and two of the letters in the vin code were misaligned to the other numbers. This was not a problem for the CHP officer.

Mounting the warranty plate was easy. I found some exact duplicates of the original rivets re-manufactured for http://dennis-carpenter.com/. They sent them over with instructions on how to mount warranty plates and after drilling a couple of well placed holes in the door sill I mounted the plate.


Pulling up into the parking lot of the local CHP field office, a big man in police blues came right up to me and said "looks like a '66 to me" starting off a 20 minute exchange of information relating to the differences in the '72 F250 he owned and Old Blue. He checked the door, heard my tale of woe regarding the DMV and took a quick look at the frame saying 'This is the second one today all ready cleaned up'. He grabbed the DMV documents out of my hand said "I'll be typing up the forms inside for about 10 minutes, stay here".

When he came back out about 10 minutes later he asked what kind of plates I was planning on getting. I told him the state was planning an offering of the the old age appropriate yellow on black California plates and I was eyeing them. He told me about another program the State has for vehicles older then 1972 called the Year Of Manufacturer (YOM) program where if you can get the same series and color of license plates originally issued with the vehicle and the little registration sticker for the year of the vehicle you can request the state to use these instead of the more expensive personalized plates. He said "Take a look on E-Bay and think about it, you have some time with your current Iowa registration" handing back the signed documents on which I noticed he had written "VIN NUMBER BY CONFIDENTIAL MEANS" - what ever that means :)

I was now ready to decide which plates I wanted and head back to DMV to register the Old Blue Truck. 

Saturday, September 14, 2013

Checking the Transmission Fluid

Old Blue still carries the Cruise-O-Matic 3 speed automatic transmission she took from the factory way back in the day. From the web, I found that the fluid can be checked and filled from the same access point. However, this access point is located in a difficult place and if top up is required, you must get the correct fluid (FORD stopped using the specified fluid years ago). You need a funnel with a long hose to reach the access point.

I read at the FTE site:
  • MX = Cruise-O-Matic Transmission used in 1965/67 F100/350's with 352's, and F350's with 240/300 I-6's.
  • You check the fluid level with the transmission's dipstick: C5TZ7A020A with the engine running after it's warmed up to normal operating temperature.
  • And...that is where mechanics fill the trans...they use the transmission dipstick's tube = C5TZ7A228B
  • Every Ford A/T fluid level is checked with a dipstick, every Ford A/T (except 1951/55 Lincoln's) is filled using the dipstick tube
Its dark back there behind the engine but I see it! 
And what kind of fluid do I use ??????  Of course the guys at the FE forum had the answer: "Type F ATF is correct for P/S & A/T for all of these piles and thru 1976 w/a C6 (ditto C4) "  I ran down to Napa and grabbed a long nose funnel and a pint and then went searching for the dipstick.


So I took a look behind the Engine and found the dipstick hiding back there. Pulling it out, wiping it clean, reinserting and pulling again I find that there is NO fluid in the transmission. I inserted the funnel into the same tube the dipstick came out of and started pouring the thick fluid into the funnel. It took a while because the fluid was thick, and I spilled a bit pulling out the funnel nose and checking the level but I did eventually get the dipstick to show FULL.

The only difference I have noticed with the old transmission is that it does not slip into neutral when sitting at a stop light.

This is the dipstick and the place to re-fill 


[This articles describes how to check the transmission fluid on a 1966 Ford F-250 Camper Special with a Cruise-O-Matic transmission ] 

Friday, August 30, 2013

Out of State Registration, California DMV

We have spent some time at the DMV this summer and have learned a lot about out of state registration and what our options are for getting California license plates for Ole Blue. First the registration process:

To register the truck we needed to provide a form telling details about the vehicle identification, when we brought the truck into the state and proof of title.  The date of entry must have been in the last 21 days or you get socked with a substantial penalty so I recommend getting this step of the process done regardless of any follow-up - no penalties if forms are submitted on time regardless of what happens next.

Then a DMV employee came out to look at Old Blue. She checked the lights, and general condition of the truck and then asked to see the VIN number on the truck. Since the drivers side door had been crushed when Old Blue tried to run away during the engine rebuild, it had been replaced with one with the VIN plate removed so there was nothing for the DMV employee to reference. I quickly googled the location of the VIN frame stamp which from previous readings on the web I had heard was in 2 different locations on these old trucks but could not remember where. Search results said on the 66 FORD it should be 'just ahead of the engine cross member on the top of the frame'. What the heck does that mean? By then the DMV employee was late for her lunch and said she would refer me to the CHP to verify the VIN and that DMV employees do not know how to do this, that I would want to get going down the next path for verification and this was the next step ... AAAACCCCCKKKK It sounded to me like I was about to get into some bureaucratic nightmare but smiled and took the retched little 1 page report she had filled out with the box labels 'DO NOT PROCESS - REFER TO CHP checked and the note 'Primary VIN plate completely removed' hastily written into the notes section.

Luckily Uncle Ken had saved the original VIN plate by cutting out a section of the now crushed drivers side door and had slipped the metal chunk into the drivers side storage compartment. I had seen it earlier and used a picture of this to successfully request information on Old Blue so knew it was around.


That night I spent a good hour and a half looking for something I did not know what it looked like and did not know where it was. The frame had to have a VIN stamp so I sanded, scraped and looked with magnifying glasses for something with letters and numbers and finally saw what I thought looked like an F on top of one of the frame rails. I carefully continued to scrape away 50 years of mud, grease and rust and saw:


A perfect match to the number on the plate Uncle Ken had put into the door compartment. The next day I called CHP and scheduled a VIN review but it would be another 5 weeks before they could see us.


Sunday, August 25, 2013

Top Dead Center

After looking on the web, at Autozone, O'Reilly's and Napa I picked up a vacuum gauge for about $15 at Napa. The model there had the connectors, the hose and the gauge all together for about the same price as the other places. I had a Sears timing light from when I used to tune my MG ...

First I checked all the spark plug gaps and set them all to 035. We were using Auto-lite BF142 plugs (which run cooler than the BF42's specified by ford). Then I let Old Blue idle for about 10 minutes to warm her up.

My plan was to:
  1. Start by first warming the engine and note the idle vacuum reading. Normal vacuum at idle should be 19-21 inches for a six cylinder, or 15-18 inches on a low compression engine. 
  2. Pre-set the ignition timing so that it is close to the manufactures recommended setting of 8 degrees BTDC, before making any carb adjustments.
  3. Lean out one of the mixture screws (turn in) until the gauge as well as the engine begins to shudder. At that point, bring the screw back towards rich (turn out), while watching the gauge.Stop adjusting when the gauge reaches it's highest reading. Then do the same process for the other mixture screw. 
  4. After each adjustment is made, reset the idle speed.
I hooked up the vacuum gauge and with the idle set as low as I could set it, (I looked at the Tachometer in the cab and it was at about 700 rpm). I checked the idle mixture screws. Starting with both screws about 1 1/2 turns out, I read this will be on the lean side so all I need to do is open them a little more. As I opened the screws the vacuum gauge read higher and higher vacuum until it stops (about 19). Old Blues hits that point at 2 1/2 turns out. With that optimized I check idle speed again as a higher vacuum also means a higher idle speed so I set for 700 one last time.

I hooked up the timing light and pointed it at the harmonic balancer - I read 23 degrees Before Top Dead Center on the Balancer, I was shocked and checked again just to be sure. Nothing I had read indicated I would expect anything more than 10 or 12 degrees. I loosened the hold down bolt on the distributor and turned it a little counter clockwise and watched as the indicator dropped to about 12 degrees before top dead center and I left it here, cranking down on the distributor hold down bolt.

I went back to the web and read with a Mallory Comp 9000 distributor with NO vacuum advance I should have seen something like
1. Initial Idle advance of 10 degrees
2. When the RPM's increase to 3,200 the Mallory kicks in and adds about 24 degrees mechanical advance.
3. This would give me a total advance at ~3,200 RPM of about 34 degrees.

From what I had read on the web about FORD 352's this would be just about right with 36-38 total advance optimal. When I start checking the vacuum readings - if I need to advance the initial timing 2 degrees I can.

I took her out for a test run and wow she pulled from stops with hella torque and took off when I stepped on the gas while cruising - OHHHHH V8 engines!


A couple of observations on driving Old Blue after the carburetor change and the timing adjustment. First, I no longer have to step down HARD on the brakes at stop signs. It actually takes very little pressure to stop and hold old blue at a stop. I think decreasing her idle speed from 1200+ to 700 has something to do with this. Second, no choke. Old blue fires right up, idles smooth until warm. Third, she has significant power under the hood and I take care not to jump on her too much!!! We now cruise at 70mph at 3000 RPM which for this old truck is very different than the previous 55mph@3000rpm. More importantly, when I do cruise at 55mph Ole Blue is turning about 2300 RPM's which should give us a bit better gas mileage.


[This document is how to tune a Ford F250 352 V8 Truck]


Tuning by Ear ...

She fired immediately upon turning the key .. WOW ... and was smooth smooth compared to the last time she ran .. I drove her around the block a few times just to see what it was like and quickly realized something wasn't quite right ... she idled fine but when I pressed down on the accelerator she kinda hesitated, then coughed, then s-l-o-w-l-y accelerated ... hmmm ...

Though she fired right up after the switch to the rebuilt 2v, the way she drove around the block was concerning. I took another look at the old carb I had pulled and then at the carburetor on Old Blue. Something wasn't right ... on the left hand side near the choke there was a hole and on the old carb there was a screw? I pulled the screw from the old carb and slipped it into the hole on the new one ... I took her around the block again and this time ... much less hesitation pulling away from the stop AND .. when I stepped on it she pulled like a bull ...

I hit the web and read everything I could find on the Autolite 2v and tuning it for the Ford FE engine. First, I needed to capture some baseline numbers on her vacuum, timing and idle settings. From what I have read on the web on these old Big Block Ford engines (and there is a LOT of great information out there) they can be testy if there are any vacuum leaks after working on the carburetors or  valve covers so I thought I had better keep my eyes open for any issues that could be related to vacuum leaks while I captured her current operating metrics.

I knew Old Blue was having a tough time when Uncle Ken sent her out  including the now familiar instructions for starting and driving her:
1. Before starting pump gas pedal hard 3 times, pull out the choke and let her run a little before driving. (This was not sooo unusual ...)
2. When coming to a stop or making a turn, ease out the choke a little to keep the engine running, etc. (This instructions always made us smile)

These hints were indeed required to keep the old 352 running and during the first month my youngest son (who always sat in the middle of the big bench seat) took it upon himself to be 'Choke Boy'; reaching down and pulling out the choke when we made turn or came to a stop of any kind, and then reaching back down after old blue picked up a little speed and pushing the choke back in. She hiccup'd pulling away from a stop no matter how warm she was and after a few weeks of putting her in the garage at night I noticed huge dark black carbon deposits on anything near her tailpipes from the over rich fuel state of operation with the old carburetor.

BUT NOW !!!!! I had to let Uncle Ken know and wrote him a quick note "WOW … I installed the carburetor today and what a difference ….easy start, quiet smooth idle, no choke action required on turns or stops … what a difference!!! No problems with air leaks or reconnecting the various controls and fuel lines … done in about 45 minutes. Poor Cricket will have to give up his job as ‘Choke Boy’ but Old Blue runs incredibly smooth .. like a limousine !!!"

Most of the articles said that the next steps would involve tuning the carburetor and timing of the ignition system. I asked uncle Ken if he knew anything about the timing or other adjustments done to Old Blue and he responded "The old carb was "tuned" in the woods while hunting as we were having problems with altitude not allowing the engine to idle.  So it was guess work on my brother's part which I thought was pretty good. When we got back down to low altitude, it seemed to run okay ... so I left it that way."  

So back to the web to find out what I could about timing the 352. I knew from previous cars I had owned that I would need a timing light and after reading many articles realized I may also want to find a vacuum gauge. I crawled under Old Blue and took a look at the harmonic balancer - like most of the metal on old blue there was a covering of light rust and I started rubbing with a scotch pad looking for any indication of the little marks I was going to need. After about 15 mins 2 XX's appeared and soon I had found the little marks ...


I continued rubbing, even bumping the starter to spin the balancer a little and soon I found the timing marks...


I painted each 10' mark with a dab of white paint and let it dry - this so I would be able to read the position better with the timing light.

[This document shows where to find timing marks on Ford F250 Truck]